
If your writer roster is growing, you have probably noticed the same fixes showing up in every draft. One writer capitalizes product names, another doesn't, a freelancer spells things a third way, and you or an editor end up correcting the same things again and again. This guide walks you through building a content style guide in seven steps, and then putting an editing checkpoint in your workflow so the guide gets applied and not just filed away.
You don't need a big team or a long document to do this. You need a short reference that answers the questions writers keep asking, and one named step in your process where a person checks the draft against it.
Step 1: Set the guide's purpose, audience, and boundaries
Start by writing a short opening statement that says who the guide is for, what kinds of content it covers, and what writers should use it to decide. List the people who create and edit your content: staff writers, freelancers, agency contributors, and editors. Then name the channels in scope, like blog articles, landing pages, email, or social posts, based on what your team actually produces.
It also helps to say what kind of document this is. People use "content style guide," "editorial style guide," "writer style guide," and "brand style guide" in overlapping ways, and there's no single naming rule you need to follow. In general, a content or editorial style guide covers written communication: voice, tone, language, mechanics, and formatting. A broader brand style guide often adds visual identity, such as color, typography, and imagery. Pick the label your team will recognize, then say in one or two sentences what the document covers and where writers should look for visual rules or other processes.
You'll know this step is done when a writer can open the guide, tell right away whether it applies to their assignment, and see where to go for questions it doesn't answer.
A common mistake here is to open with a long list of punctuation rules before explaining why the guide exists or who should use it. Without that context, writers tend to treat it as an arbitrary rulebook, and an arbitrary rulebook is the kind that gets ignored.
Step 2: Agree on the audience and the brand's writing character
The next step is deciding how your brand should sound, and this works best when it's a conversation and not a single person's call. Bring in the people accountable for the brand and the people who write or edit for it. A useful exercise is to ask each of them to describe the brand as it is today, where it's heading, and what it is not. Then narrow the answers to a short set of defining adjectives. Salesforce's brand voice guidance suggests agreeing on three or four, which is a small enough number that writers can actually keep them in mind.
Adjectives on their own don't help much, so pair each one with a plain explanation and an example of what a writer might do on the page. For instance:
- "Clear" can mean choosing familiar words and explaining specialist terms the first time they appear.
- "Friendly" can mean direct, human language, without forced jokes or overfamiliarity.
- "Confident" can mean saying what the brand can support and not inflating claims.
- "Expert" can mean explaining difficult material, not leaning on jargon.
This is also the place to separate voice from tone. Voice is the fairly stable personality of the writing, and tone is the adjustment you make for the reader and the situation. A brand might be clear and respectful everywhere, while sounding more encouraging in a how-to and more direct in a short service message. Mailchimp's public guide makes this distinction well in its voice and tone section, and it adjusts tone to the reader's state of mind, which is a good model to borrow from. If your brand leans plain and casual, our notes on how to write blog content in a conversational voice show what that looks like in practice.
Then add real examples. Show a version that fits, a version that misses, and a sentence or two on why. If you want a deeper walk-through of this part, our piece on how to document your brand voice and tone covers it for both people and AI tools.
You'll know this step is done when a writer can pick a fitting tone for a situation and explain how the brand should sound without falling back on vague instructions like "make it pop."
Pro tip: Describe voice as things a writer can observe on the page. "Plainspoken, explains terms on first use, and avoids unsupported superlatives" gives a writer something to check. "Approachable and innovative" doesn't.
Step 3: Choose a baseline and document the rules writers repeatedly need
You don't have to write a full grammar manual, and you shouldn't try. Pick one established editorial reference as the default for everything your guide doesn't cover. The AP Stylebook and the Chicago Manual of Style are common examples, and the right choice depends on your audience, where you publish, and which variety of English you write in. Then record only your house exceptions, so writers never have to guess which convention wins.
Build the rules around decisions that come up again and again. A good starting list looks like this:
- Spelling variety and preferred spellings.
- Capitalization of company, product, and role names.
- Punctuation choices, including the serial comma and how you handle dashes.
- How you write numbers, dates, abbreviations, and acronyms.
- Hyphenation and commonly confused terms.
- Preferred terminology, product names, and words to avoid.
- Headings, lists, bold, italics, and any other formatting your publishing format uses.
- Voice, tone, and word choice, with examples of good and bad execution.
- Link, image, or metadata conventions you expect contributors to apply.
Keep a short alphabetical glossary for the terms people keep asking about. State the preferred term and, where it helps, what not to call it. If you want a quick starting point for the word-level material, a list of words and phrases to cut is a handy thing to link from the glossary.
For each rule, a repeatable entry pattern keeps the guide easy to scan:
- Decision: the preferred form.
- When it applies: the content or context it covers.
- Example: the preferred form in a short sentence.
- Avoid: a common alternative you don't want, when that makes the rule clearer.
- Why: a short reason, when the choice isn't obvious.
- Related guidance: a pointer to another section.
Whether you use a serial comma, how a product name is capitalized, or whether a term is one word or two are all choices your team gets to make. They aren't universal rules, so write down yours.
If you produce articles with DeepSmith, this is also the step where your rules can do double duty. Deep IQ stores Brand Voice and Content Types as structured brand context, which gives generated articles consistent grounding in how you write. It sits alongside your guide, though, and doesn't replace it. People still need a readable reference with your rules, examples, and exceptions, so write the human version first. If you're curious how structured context shapes drafts, we cover that in how to ground AI content in your brand voice and product facts.
You'll know this step is done when a writer can settle common questions about voice, terms, spelling, and formatting without asking you to make the same decision again.
A common mistake is trying to legislate every possible sentence. Keep the guide focused on recurring, high-impact choices, and when a rule is unusual, explain the reason and show an example so it makes sense to the person following it.
Step 4: Make the guide easy to search, scan, and trust
A guide that takes five minutes to dig through won't get opened in the middle of an assignment. Publish one canonical version that staff and outside writers can both reach, and organize it by topic or task. Give it clear headings and a search function or an alphabetized index so a writer can jump to one rule. Mailchimp's guide is divided by topic and searchable, and the GOV.UK A to Z style guide is a good example of alphabetical organization with search navigation.
A few things give writers a quick way in:
- A short "how to use this guide" section at the start.
- The most-used rules and examples near the top, or on a quick-reference page.
- Headings that sound like the question a writer would type into a search box.
- Links between related sections.
- The name of the guide's owner, and how to ask a question or suggest a change.
- A review date or version number, so people can tell current guidance from an old file.
A shared document or an intranet page works better as the single source of truth than a PDF that circulates as separate attachments. A downloadable copy can be convenient, but it should point readers back to the maintained version.
You'll know this step is done when a writer can find a rule during a real assignment and can tell whether the page they opened is the current one.
A common mistake is publishing the guide once and then letting copies spread through email, shared folders, and old onboarding packs. Within a few months, nobody is sure which version is right, and writers go back to guessing.
Step 5: Pilot the guide and onboard the people who will use it
Before you call your writer style guide finished, test it against real recent content. Ask a couple of writers and editors to use it to answer the sort of questions that come up in their work. Note where a rule is missing, hard to find, unclear, or too subjective to apply the same way twice. Then fix the wording and examples before you make it the team's reference.
When the guide is ready, bring it into onboarding for staff writers, freelancers, and agency contributors. Walk through the purpose, the voice examples, the default editorial reference, the exceptions, and the route for questions. Explain the reasoning behind the notable rules, because a writer who understands the intent can apply it in a situation the guide never covered, while a writer who only has a list has to guess. Make sure everyone has access to the same current version, and invite feedback from the start.
If you want a head start on the production side, a set of reusable article templates pairs well with a guide, because the template handles structure and the guide handles language.
You'll know this step is done when a new contributor can find the guide, understand the core voice and style choices, and knows who to ask when something isn't covered.
A common mistake is sending a link with no context and hoping it lands. A freelancer can't be expected to work out on their own how an abstract descriptor like "warm" turns into actual copy, so show them.
Step 6: Put a named style-and-copyediting pass in the workflow
This is the step that decides whether the guide gets used. Make the editing pass an explicit production stage that comes after the writer submits a draft and before the piece is finalized or handed to design or publishing. Ask the writer to self-check first, using a short checklist, and then have the editor apply the guide. That's your enforcement point. The rules become part of the recurring work and stop being advice that writers are expected to remember.
A practical editing pass can go in this order:
- Purpose and reader. Does the draft answer the assignment for the intended audience, and are unfamiliar ideas explained without assuming the reader knows as much as the writer?
- Clarity and flow. Is the material easy to follow, sensibly ordered, concise, and free of ambiguity, avoidable repetition, or unnecessary material?
- Voice and tone. Does the draft sound like the brand, and is the tone right for the reader's situation and the content type? Are claims proportionate and the language respectful?
- House style and terminology. Check the preferred spellings, capitalization, names, abbreviations, punctuation, glossary terms, and stated exceptions, and check that they hold across the whole draft.
- Presentation and mechanics. Apply the relevant formatting rules, and correct spelling, grammar, punctuation, and other mechanical issues.
- Questions and handoff. Query the writer where the intent is unclear. If a draft needs a full rewrite or a substantial change, agree whether it goes back to the writer or whether the editor has permission to make the change, and settle that before design or publishing work begins.
The editor's job is to improve clarity and consistency while keeping the writer's voice and meaning wherever possible. If a sentence is ambiguous and the context doesn't settle it, ask the writer, and offer a couple of plausible readings so the question is quick to answer. Don't quietly change what a writer meant just because it fits a style preference better. Keep a running note of the fixes you make again and again, because that list feeds the next step. If you want a way to judge whether a draft is ready to leave this stage, a rubric for scoring draft quality before publishing can help.
The writer's self-check can be short enough to use on every assignment. Something like this works:
- Is the purpose and intended reader clear?
- Does the draft reflect the agreed brand voice, with the right tone for this format?
- Are preferred brand and product terms used consistently?
- Did I follow the relevant spelling, punctuation, capitalization, and formatting rules?
- Are specialist terms and acronyms explained when needed?
- Did I check the guide for relevant exceptions and examples?
- Are unresolved questions flagged for the editor instead of silently guessed?
A checklist is a reminder and doesn't replace the guide or the editor's pass. For a more detailed, line-level checklist you can borrow from, see the editing checklist for drafts, and for keeping one voice across many people, maintaining one brand voice across contributors goes further on that problem.
If you use DeepSmith's Content Studio, the Writer uses your stored brand context to produce brand-grounded articles, and Produced Content is where you review and edit them before publishing. That supports a consistent production workflow. It doesn't guarantee exact compliance with every rule in a human style guide, so keep the editor's guide-based pass as the place where you check the finished draft.
You'll know this step is done when your workflow names the person or role responsible for the pass, the checklist points to the current guide, and any unresolved question about style or meaning has a clear path back to the writer.
A common mistake is treating the editing pass as permission to rewrite every contributor into one person's voice. Apply the agreed rules the same way each time, keep the intended meaning, and send substantial rewrites back instead of making them quietly.
Step 7: Review recurring problems and keep the guide alive
The last step is keeping the guide current, and it's the one most teams skip. Assign an owner, or a small group, to maintain it. Give writers and editors a feedback channel, and set a regular review schedule. WG Content, in its advice on creating a writing style guide, recommends an annual review, and changes in products, terminology, or content types, or the same editing question coming up repeatedly, can be reasons to update sooner.
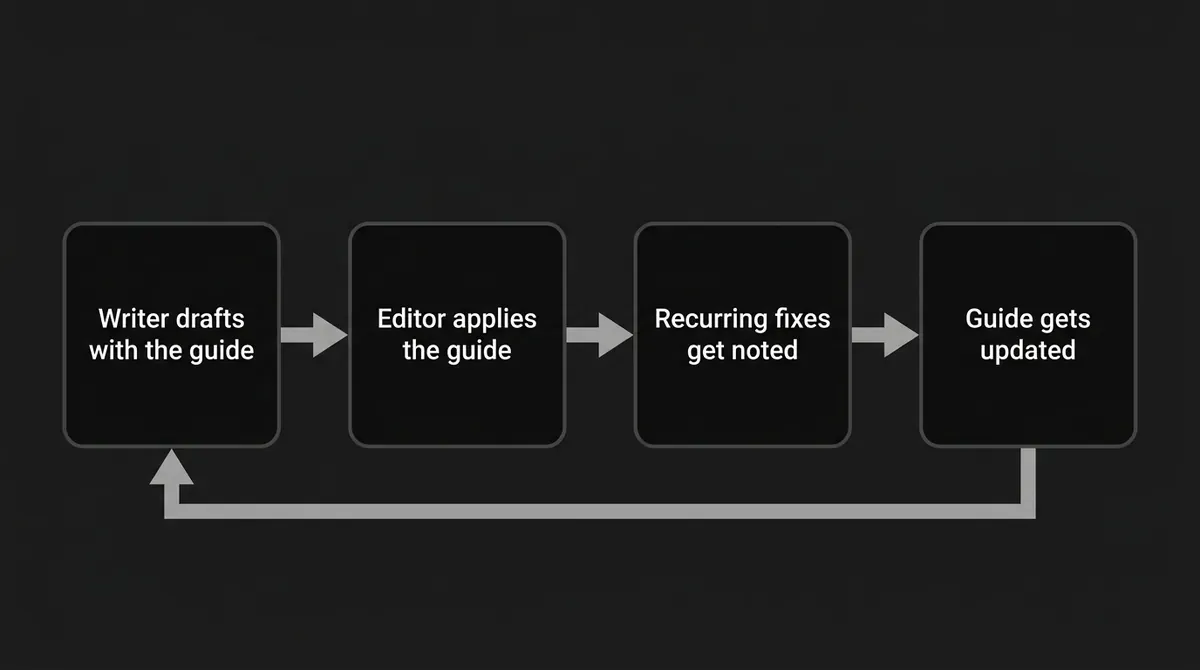
Use the editing pass as a learning loop. Keep track of the rule questions that come up repeatedly, the corrections you make again and again, and the guidance writers struggle to find. For each one, decide whether it calls for a clearer example, a new glossary entry, a changed rule, or some one-to-one coaching. When you change something, update the canonical copy, note the revision, and tell the roster what's different.
The loop below shows how the pieces feed each other. Writers draft with the guide, the editing pass catches what the guide didn't prevent, and the recurring fixes go back into the guide.
You can watch a few internal signals as you go: repeated edits for the same issue, writer questions about the same term, and whether contributors can find the guidance they need. These are local process checks and not industry benchmarks, so don't set a target score or promise an improvement unless your team has measured it. If you want a broader view of where this fits in running a content team, the brand consistency QA checklist is a useful companion, and if you're keeping voice steady while volume grows, preserving brand consistency while scaling goes into that.
You'll know this step is done when the owner, the feedback route, the review schedule, and the change process are all clear, and edits to the guide actually reach the people who use it.
A common mistake is treating the guide as finished after launch. A growing roster and changing content needs will expose gaps that the original authors couldn't see, and a guide that doesn't change will slowly stop matching the work.
What to do next
Pick one real assignment coming up this week and run it through the whole path. Give the writer the guide, ask them to use the self-check, and have your named editor do the pass. Write down every question that comes up on the way, and use those as the first edits to the guide. That's usually enough to show you which steps need more work before you roll it out to everyone.
If you'd like to see how brand context and production fit together in one place, you can start a DeepSmith free trial and try it on a real article.